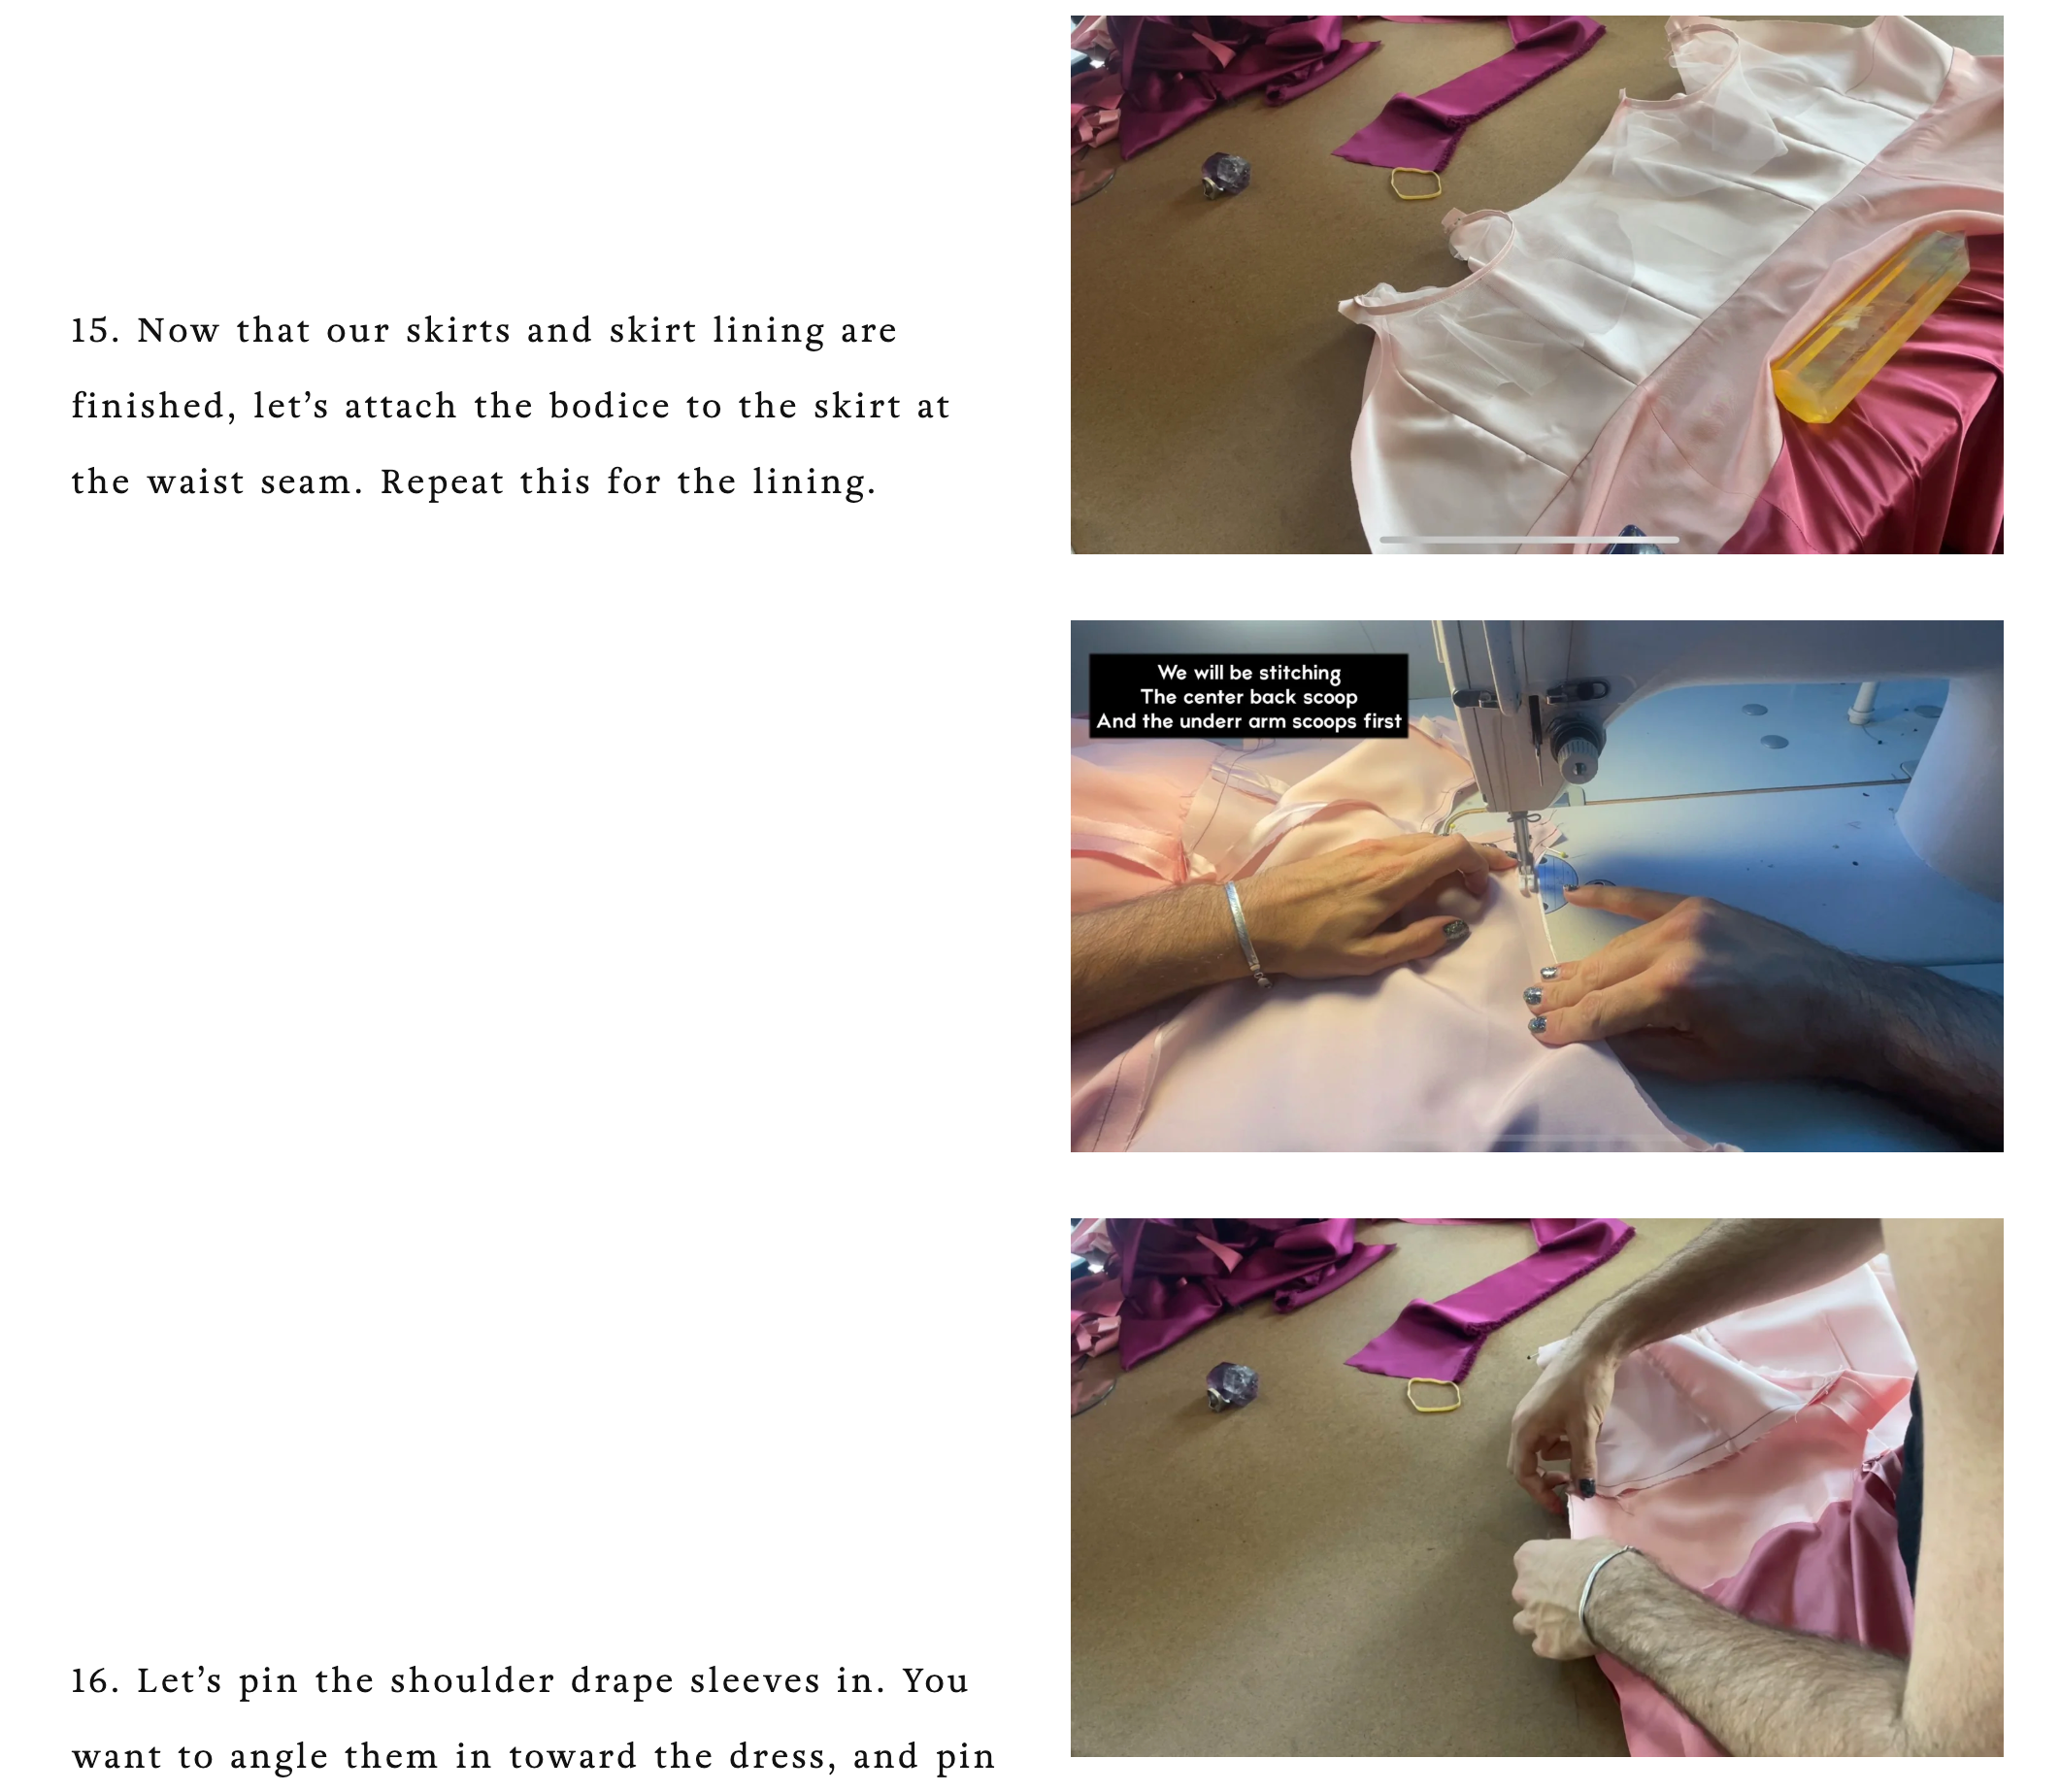
The Oleander Sewing Pattern Guide

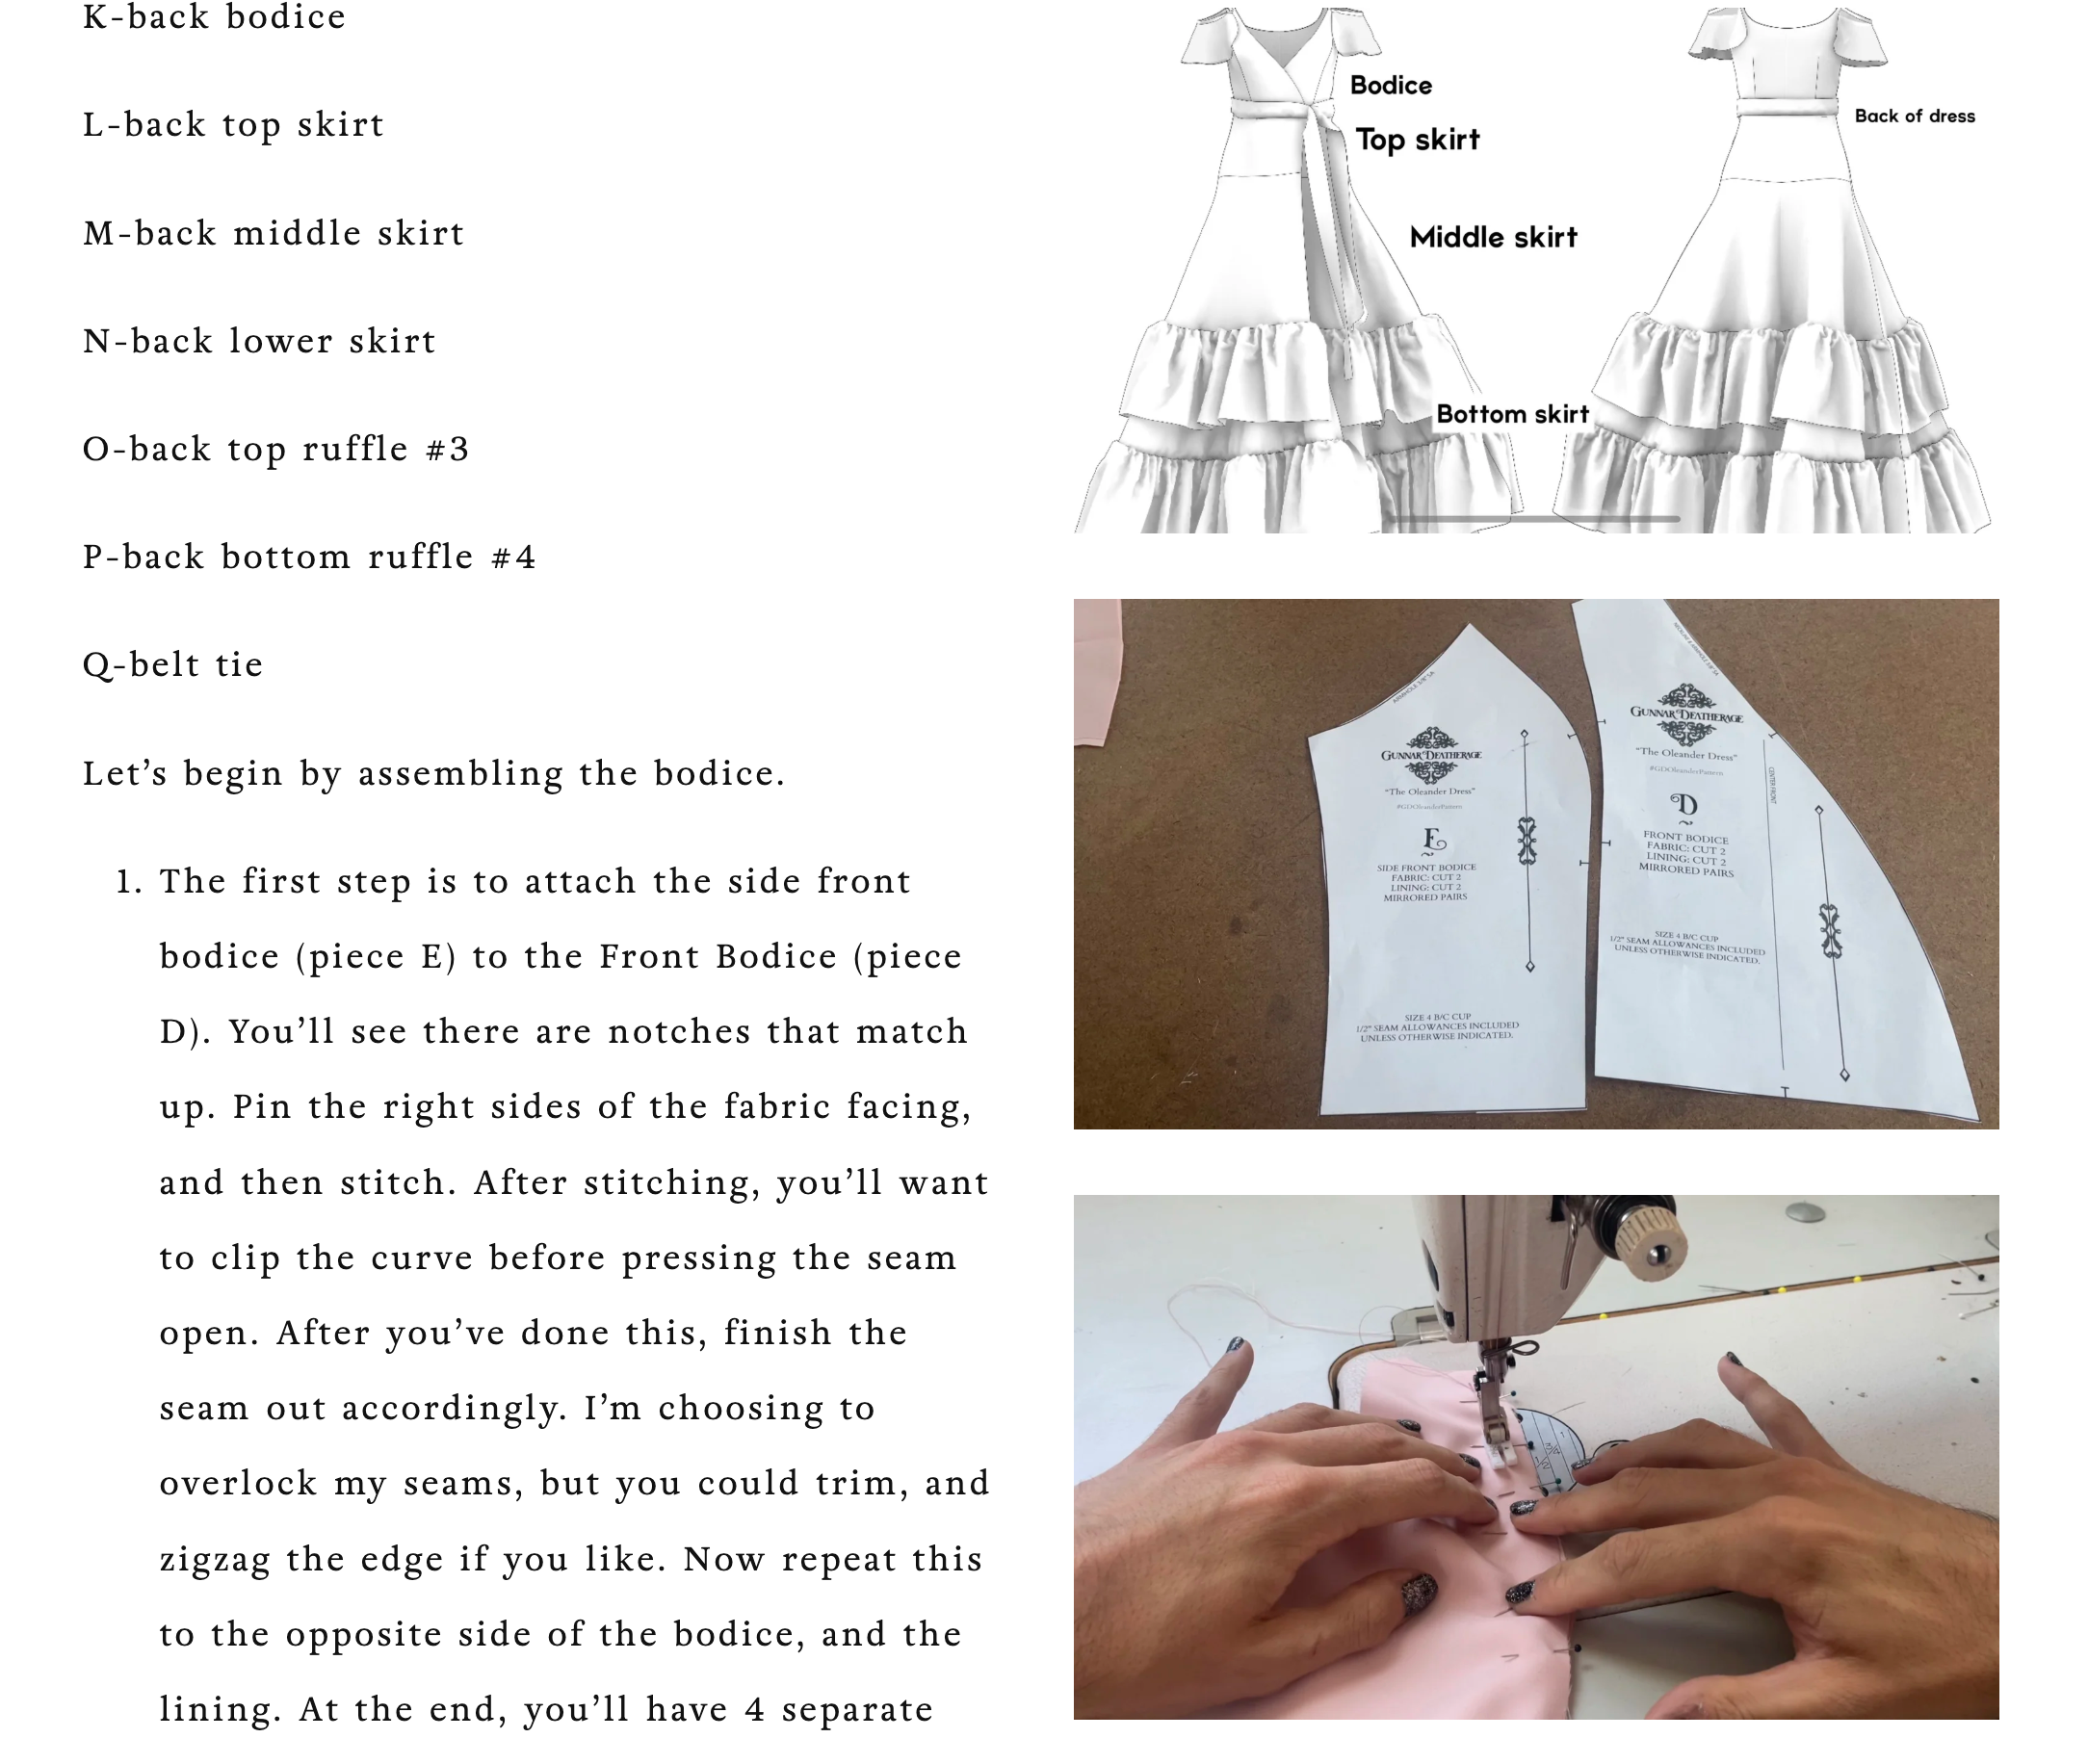
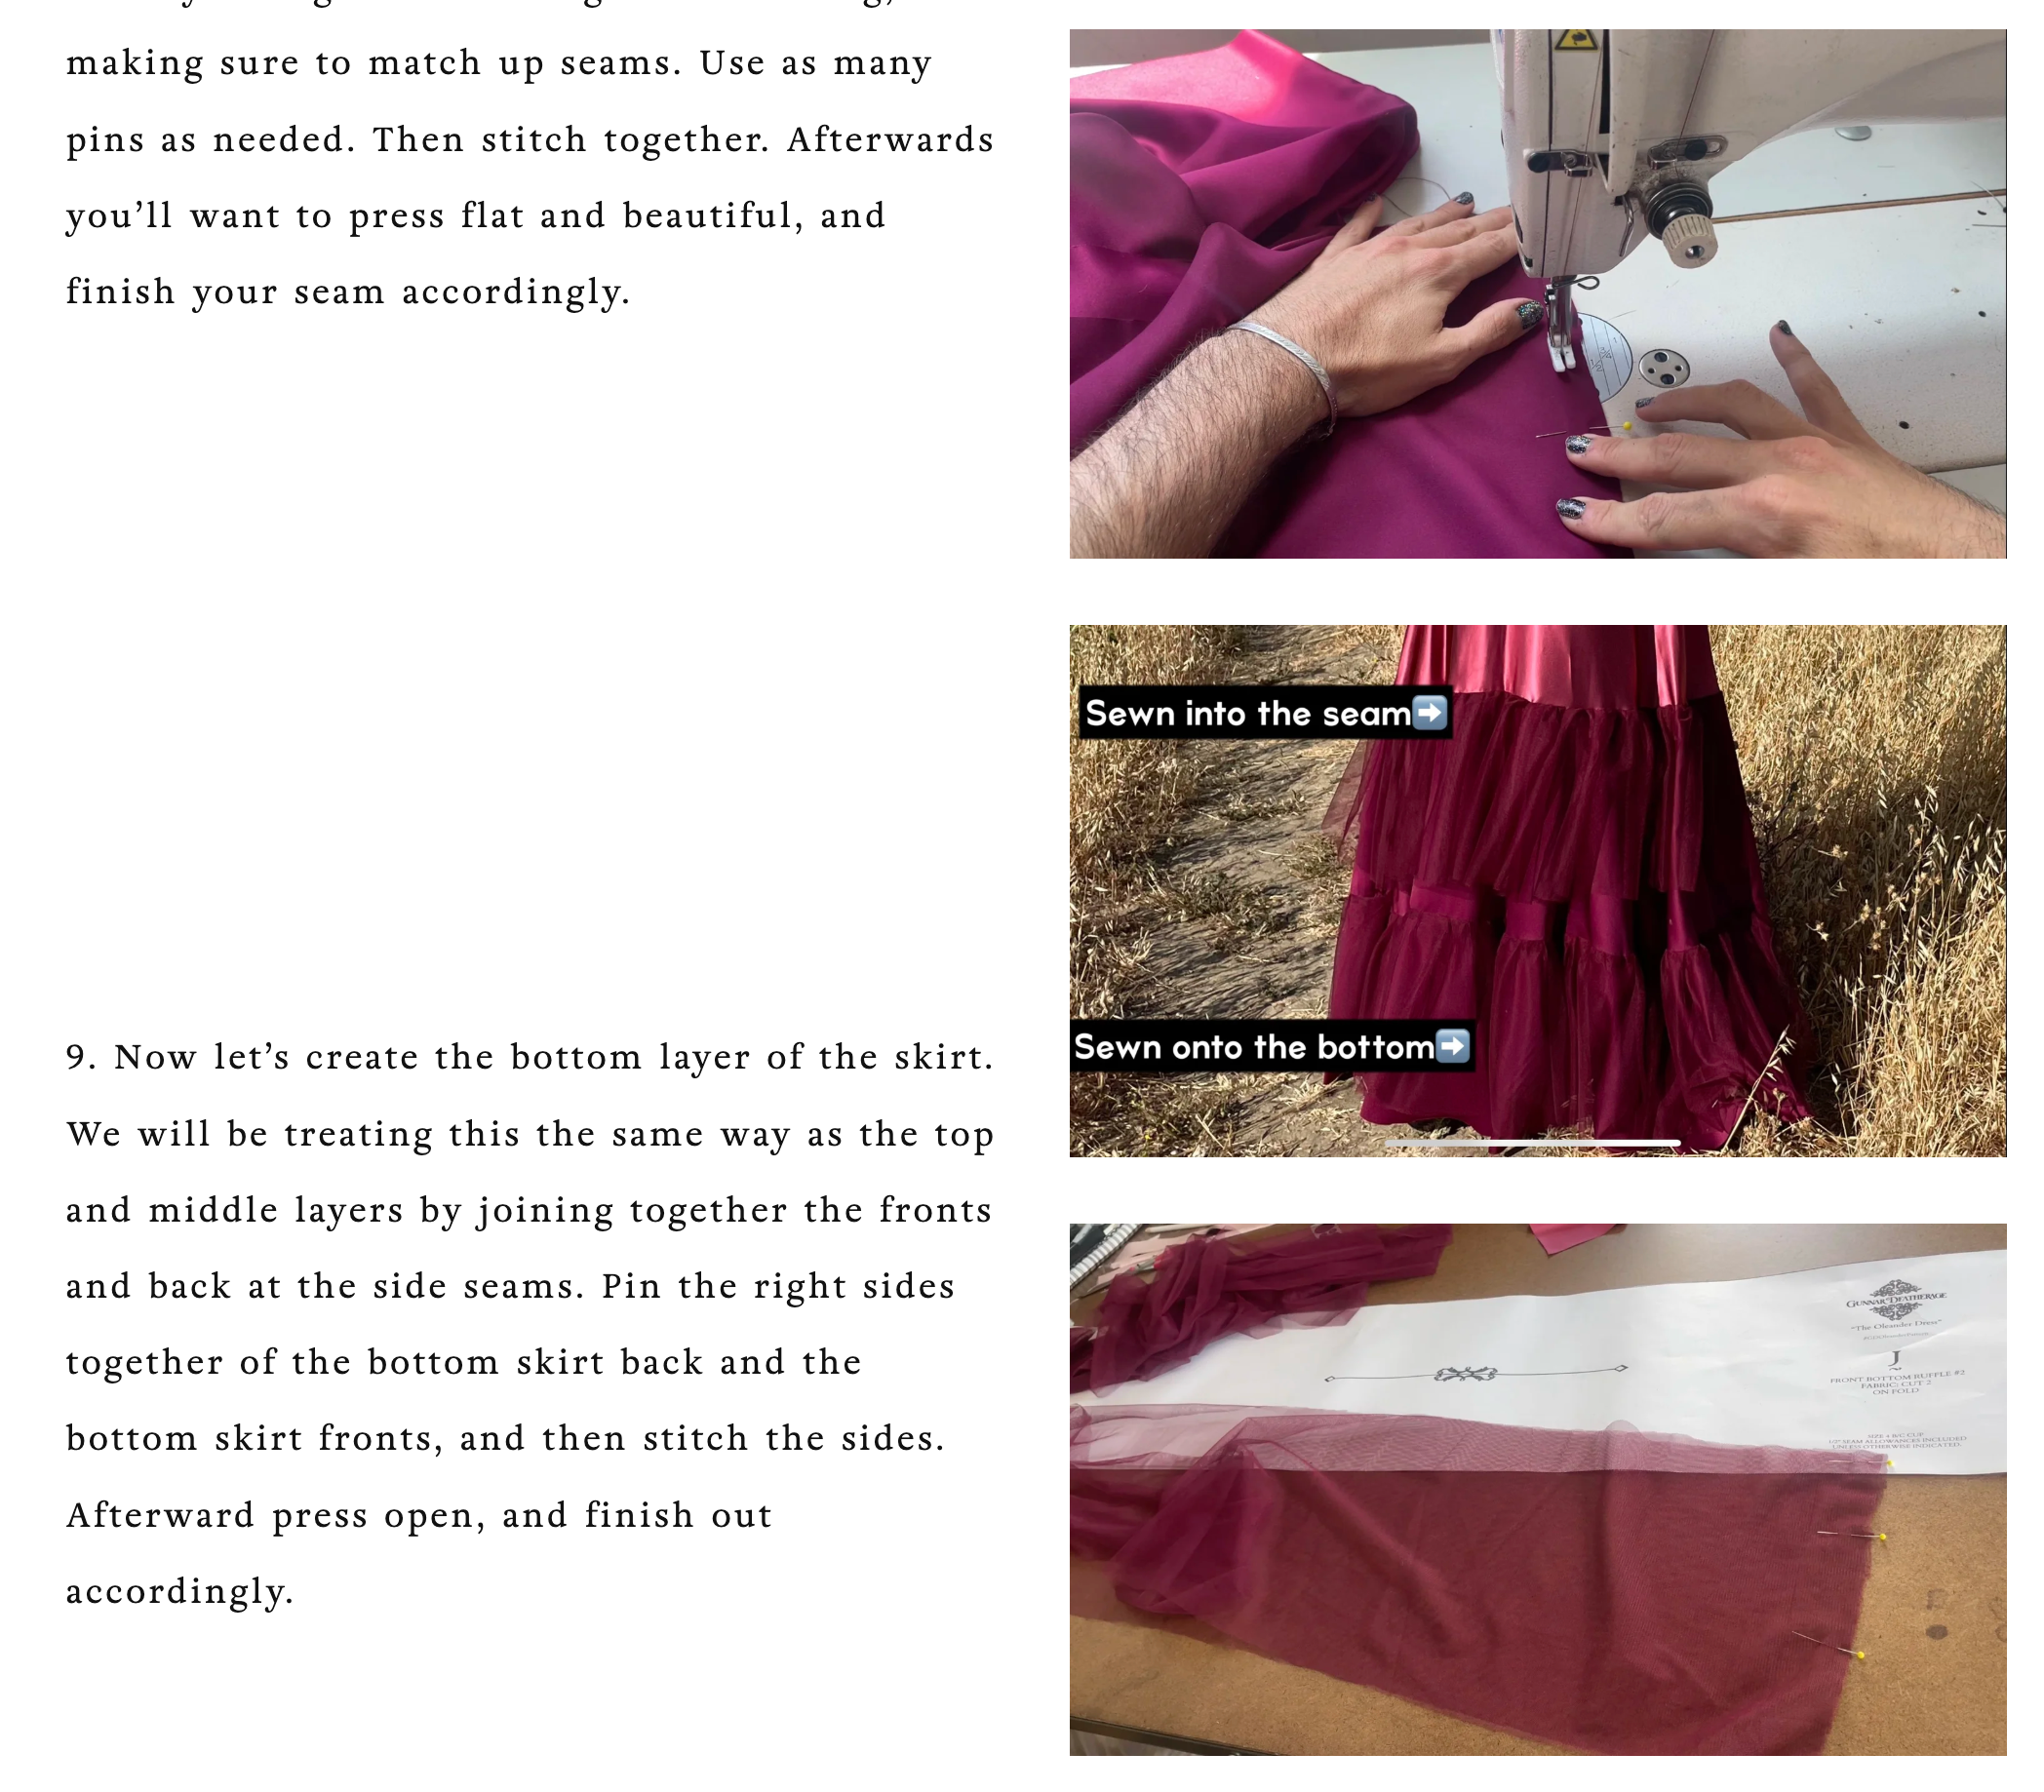
Welcome to the Oleander Dress! This wrap dress features an optional off the shoulder strap with flutter sleeve, a wrap feature that can be secured with hook and eyes, or with the waist tie that is included with this pattern. For my sample, and the one Iā€™m making in this video, I will be color blocking. The dress has four sections. The top bodice, top skirt, middle skirt, and bottom skirt. There are also optional ruffles that will be added onto the bottom layer of the skirt, and one sewn into the seam of the middle and bottom skirt.

Before we hop into the dress, I always suggest making a muslin mock-up so that you can ensure the perfect fit of your garment. A sewing pattern is meant to be the jumping off point for you to create your dream garment. This dress would be perfect for light weight chiffons, georgettes, charmeuse, or soft tulle netting. Iā€™ll be using different charmeuse and satin fabrics for the base of the dress, but he ruffles at he bottom, and the flutter sleeve are a soft tulle netting.

The yardage, will be noted on the pattern itself. All seam allowances are noted on the pattern pieces themselves. This pattern works great with chiffons, stretch knits, mesh, and any fabric youā€™d like to have a duster or cardigan out of. This is a very beginner friendly piece, and has minimal steps to complete!

Below are the written sewing instructions, and I also filmed a step by step Youtube video of the entire creation process of this robe which is on the left of this text box! When you make your Oleander Dress, please tag me! I would love to see what your garment looks like!!


Please also take note of the seam allowances on each pattern piece as they are slightly different for each piece.

Letā€™s begin by familiarizing ourselves with the pattern pieces. They are listed below, and each pattern will tell you how many need cut of each fabric.

A-shoulder strap

B-shoulder swag strap

C-shoulder drape

D-front bodice

E-side front bodice

F-front top skirt

G-front middle skirt

H-front lower skirt

I-front top ruffle#1

J-front bottom ruffle #2

K-back bodice

L-back top skirt

M-back middle skirt

N-back lower skirt

O-back top ruffle #3

P-back bottom ruffle #4

Q-belt tie

Letā€™s begin by assembling the bodice.

  1. The first step is to attach the side front bodice (piece E) to the Front Bodice (piece D). Youā€™ll see there are notches that match up. Pin the right sides of the fabric facing, and then stitch. After stitching, youā€™ll want to clip the curve before pressing the seam open. After youā€™ve done this, finish the seam out accordingly. Iā€™m choosing to overlock my seams, but you could trim, and zigzag the edge if you like. Now repeat this to the opposite side of the bodice, and the lining. At the end, youā€™ll have 4 separate pieces for the front bodice and bodice lining.

2.Now letā€™s work on the bodice back. Youā€™ll see there is a place for darts. Mark the darts with a tracing paper, or a tailors chalk. Now stitch the darts closed, and then press them flat.

3.Now we will stitch the side seams of the bodice by attaching the bodice side front to the bodice back at the side seam. After stitching, press open. Now repeat this to the lining.

4. Now letā€™s make our shoulder straps. Youā€™ll want to make sure they are the correct length, so you may want to hold your bodice pieces up to your body or form, and measure to make sure you have the right length. Pin one of the strap pieces in half, and then stitch one side. Please note the seam allowance here is 1/4". After pinning, stitch the other strap. Now we can turn them right side out, and press/top stitch. If you donā€™t have a fabric turner, you can use a small safety pin by pinning into one side of the fabric at one end, and then closing the pin, afterward you will guide the pin through the inside of the strap, and pull the right side out.

5. Now letā€™s work on the sleeve. This step is optional if you donā€™t want to have the additional flutter sleeve. Iā€™m using a soft tulle so I wonā€™t need to hem the edge, but if you are using a fabric that will fray, you will need to hem the fabric first. Now we can see the swag strip along the top of the drape sleeve. Pin the right side facing and stitch at 1/4". Now press the seam allowance away from the seam, and fold in the other seam allowance to meet the original seam allowance, and then fold in half again. Weā€™re basically making a bias tape to enclose the top of the netting sleeve. After you have pinned, it my help you to press it closed before stitching. Stitch that piece closed along the top of the sleeve by top stitching, me then repeat this to the other sleeve.

6.Now letā€™s work on the skirt. Start by stitching the Top Back skirt to the top Front Skirt at the side seam. Youā€™ll see both pieces have a slight curve, so match with right sides facing, and then stitch together. Afterwards press open. Now repeat on the opposite side, and then recreate these steps on the lining.

7.Next up we will repeat these steps for the middle layer by pinning and stitching the Middle Fronts to the Middle Back at the side seams, and then repeating to the lining.

8.Now that we have the top and middle layer of the skirt assembled, letā€™s attach them. Youā€™ll see that the top skirt seams align with the middle skirt, and so we will attach them here. Pin the two layers together with right sides facing, making sure to match up seams. Use as many pins as needed. Then stitch together. Afterwards youā€™ll want to press flat and beautiful, and finish your seam accordingly.

9. Now letā€™s create the bottom layer of the skirt. We will be treating this the same way as the top and middle layers by joining together the fronts and back at the side seams. Pin the right sides together of the bottom skirt back and the bottom skirt fronts, and then stitch the sides. Afterward press open, and finish out accordingly.

10. Before we can stitch the bottom skirt onto the rest, we need to address the ruffles. This skirt features 2 ruffles. One that is sewn onto the bottom layer of the skirt, and one that is sewn into the seam between the middle and bottom layer.to begin, letā€™s assemble the bottom ruffle, which is pieces J and P. We will stitch the front bottom ruffles to the back bottom ruffles at the side seams. With right sides facing, pin the side seams and stitch/finish out.

11. Before we gather, lets mark where this ruffle will go. There is a line along the bottom skirt piece that shows where the ruffle will be sewn on. You can mark this using a tracing paper, pins, or a tailors chalk, but you will want to do this before gathering.

12. After marking, you will want to create a gather stitch along the top of the ruffle. After gathering, you should go ahead and hem your ruffle while itā€™s flat and not gathered. After gather stitching, pull one thread to gather that ruffle to the length of the line you marked on the bottom skirt. Now letā€™s pin the furrow to the skirt. I am pinning the ruffle where the bottom of the ruffle faces the top of the skirt piece, and Iā€™m doing this so after I sew it, the ruffle will hang over where we sewed, leaving a clean finished edge where itā€™s sewn on.

13. Now letā€™s create the ruffle that is sewn into the seam between the middle and bottom skirt sections. These are pieces O and I. We will follow the same steps as the previous ruffle steps. Stitch the sides together with right sides facing, and then create a gather stitch along the top. We will be gathering the ruffle to the length of the circumference of the bottom of the middle layer of the skirt.

14.After stitching the middle to the bottom skirt, you will then stitch the middle and bottom skirt linings together.

15. Now that our skirts and skirt lining are finished, letā€™s attach the bodice to the skirt at the waist seam. Repeat this for the lining.

16. Letā€™s pin the shoulder drape sleeves in. You want to angle them in toward the dress, and pin them about 1ā€™4" from the top of the strap sections. After pinning these in place, you will then pin the lining to the dress with right sides facing, we will be sewing along the center back, and under arms first. Keep in mind we wonā€™t be closing in the top point of the strap point because we still need to insert the strap.

17. After stitching the center back and under arms, we will be sewing the center front seams. Start on the other side of where we will insert the strap. And work your way down the center front seams of the dress, pinning the right sides facing. Now stitch the center front. What this will do for the top of the dress where we are inserting the strap, is create a small opening that is the perfect size for our strap. After you have closed up the center front, letā€™s insert the strap. 

18. At the moment the dress should still be wrong side out, now insert the straps into the openings we left from the inside of the dress. Pin them in, making sure they arenā€™t twisted. After pinning, stitch the straps into the dress, making sure to backstitch to make them sturdy. 

19. Now turn the dress right side out, and press the seams nice and flat. 

20. We can now work on adding closures to the dress.  Because Iā€™ve heard so much about wrap dresses being finicky with a long strap to close it, I decided to make this dress close with hook and eyes. You could easily create this dress to close like their wrap dresses, you would just need to sew the sash into the dress a little differently rather than treating it like an embellishment.

21. When deciding where to stitch the hook and eyes, put the dress on, and cross it over your body find the most comfortable place to add your closures, and mark them. Now stitch your hook and eyes on. You may want to do hook and eyes on both sides of the cross over if that feels more secure on you.

22. To create the sash, fold piece Q in half long ways. And pin. Stitch one end closed and down the sides. After stitching, turn the belt tie right side out, and press. After pressing, you could top stitch, and then hand stitch the end closed. Now you can tie your wrap dress up.

23. The last step would be to hem the bottom layer, and the lining, as well as the two ruffles if you arenā€™t using a soft tulle netting.